A shed can be much more than a place to store garden tools. With the right insulation, it can become a comfortable workshop, home office, gym, hobby room, studio, or year-round storage space. Whether you want to protect your belongings from damp and cold or create a warmer space to work in, insulating your shed is one of the most effective upgrades you can make.
Shed insulation helps regulate temperature, reduce condensation, improve energy efficiency, and make the space more comfortable during both winter and summer. The good news is that you do not always need to be a professional builder to do it. With the right materials, careful preparation, and a clear plan, many shed insulation projects can be completed as a practical DIY job.
In this guide, we explain how to insulate a shed step by step, including the best insulation materials to use, how to prepare your shed, and how to insulate the walls, floor, roof, doors, and windows.
Why Should You Insulate a Shed?
Insulating a shed is especially useful if you want to use the space for more than basic storage. Standard garden sheds are usually built with thin timber panels, which means they can quickly become cold in winter, hot in summer, and prone to moisture build-up.
The main benefits of insulating a shed include:
- Better temperature control throughout the year
- Reduced condensation and damp
- Improved comfort if using the shed as a workspace
- Protection for tools, furniture, electronics, and stored items
- Lower heating costs if you use an electric heater
- Reduced noise from outside
- Increased usability and value of the space
If your shed is going to be used as a garden office, workshop, games room, home gym, or creative studio, insulation is highly recommended.
Before You Start: Check the Condition of Your Shed
Before adding insulation, inspect your shed carefully. Insulation will not solve structural problems, leaks, or rot. In fact, covering these issues can make them worse over time.
Check for:
- Leaks in the roof
- Gaps around windows and doors
- Damp patches
- Rotting timber
- Cracks in walls or flooring
- Poor ventilation
- Signs of mould
- Loose panels or damaged felt
Repair any issues before you begin. A shed should be dry, stable, and weatherproof before insulation is installed.
What Is the Best Insulation for a Shed?
The best insulation for your shed depends on your budget, how you use the space, and how much room you have inside.
1. Foil-Backed Insulation
Foil insulation is a popular option for sheds because it is lightweight, easy to install, and helps reflect heat. It is often used on shed walls and roofs.
Best for: Basic temperature control, small sheds, and budget-friendly projects.
2. Rigid Foam Boards
Rigid foam insulation boards, such as PIR boards, offer excellent thermal performance and are ideal for walls, floors, and roofs. They are more expensive than some alternatives but provide strong insulation without taking up too much space.
Best for: Garden offices, workshops, studios, and year-round use.
3. Mineral Wool Insulation
Mineral wool is commonly used in homes and can also be used in sheds. It provides good thermal and acoustic insulation but must be protected from moisture.
Best for: Timber-framed sheds with enough wall depth.
4. Bubble Foil Insulation
Bubble foil insulation is affordable and easy to fit. It is not as thermally effective as rigid boards but can still help reduce heat loss and condensation.
Best for: Light-use sheds and storage spaces.
5. Natural Insulation
Materials such as sheep’s wool or wood fibre insulation can be a good eco-friendly option. They are breathable and effective but usually cost more.
Best for: Sustainable builds and premium garden rooms.
Tools and Materials You May Need
Before starting, gather your tools and materials. Depending on the insulation type, you may need:
- Insulation material
- Tape measure
- Utility knife or insulation saw
- Staple gun
- Foil tape
- Timber battens
- Screws or nails
- Drill or screwdriver
- Sealant or expanding foam
- Damp-proof membrane
- Plywood, OSB, or plasterboard lining
- Protective gloves
- Dust mask
- Safety glasses
Always follow the manufacturer’s safety instructions when handling insulation.
Step-by-Step Guide: How to Insulate a Shed
Step 1: Clear and Clean the Shed
Start by removing everything from inside the shed. Sweep the floor, clean the walls, and remove cobwebs, dust, or debris. This makes it easier to inspect the structure and install insulation properly.
If the shed has been used for storage, check the corners and floor for damp marks or mould. Any moisture problem should be fixed before insulation is added.
Step 2: Seal Gaps and Draughts
A shed can lose a lot of heat through small gaps. Before installing insulation, seal obvious draughts around windows, doors, wall panels, corners, and the roofline.
Use exterior-grade sealant for small cracks and expanding foam for larger gaps. Weatherstripping can also be fitted around doors and windows to reduce draughts.
This step is important because insulation works best when the structure is properly sealed.
Step 3: Add a Damp-Proof Layer
Moisture is one of the biggest problems in sheds. A damp-proof membrane can help protect the insulation and interior lining from moisture coming through the floor or walls.
For floors, lay a damp-proof membrane before installing insulation boards. For walls and roofs, breathable membranes or vapour control layers may be used depending on the type of insulation and shed construction.
Good moisture control helps prevent condensation, mould, and timber damage.
Step 4: Insulate the Shed Floor
The floor is often overlooked, but it can be one of the main sources of heat loss. If your shed sits on a cold concrete base or raised timber floor, floor insulation can make a big difference.
How to insulate a shed floor:
- Remove any existing floor covering.
- Lay a damp-proof membrane if needed.
- Fit rigid insulation boards between floor joists or across the floor.
- Seal gaps with foil tape or expanding foam.
- Cover the insulation with plywood or OSB board for a strong walking surface.
If you do not want to lift the floor, you can place insulation boards on top and then add a new boarded layer, but this will slightly reduce the internal height.
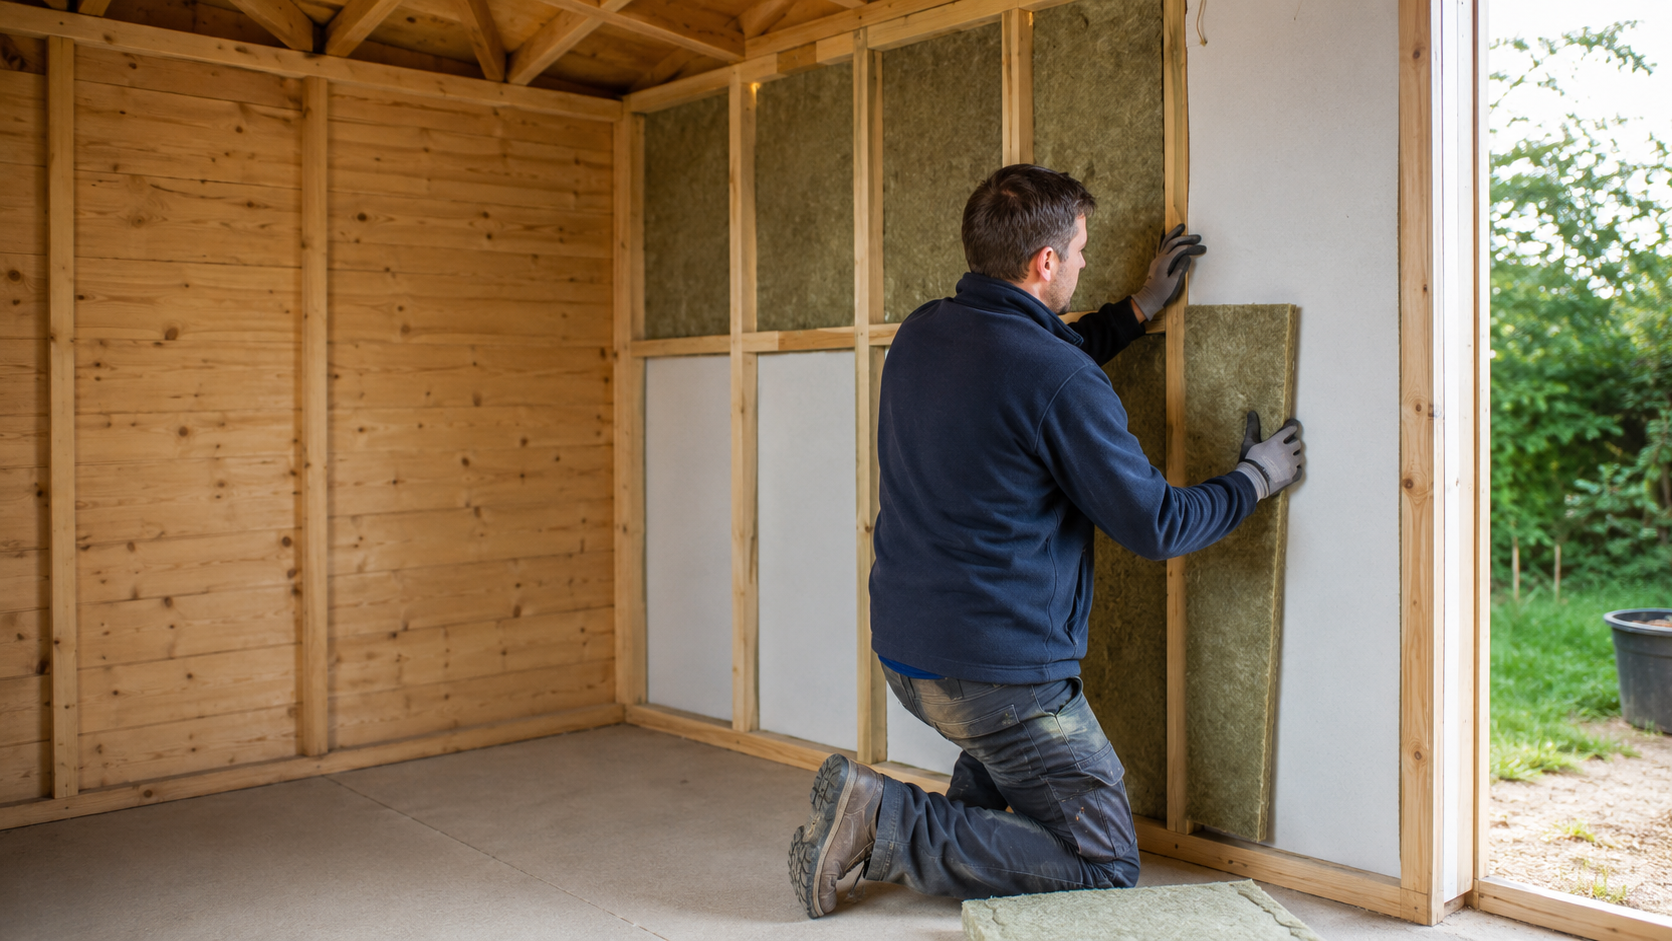
Step 5: Insulate the Shed Walls
Walls usually make up the largest surface area of a shed, so insulating them is essential if you want the space to feel warmer.
How to insulate shed walls:
- Measure the space between the wall studs.
- Cut insulation to fit snugly between the timber frame.
- Push the insulation into place without compressing it too much.
- Seal joints and gaps with foil tape or sealant.
- Add an internal lining such as plywood, OSB, tongue-and-groove cladding, or plasterboard.
Rigid foam boards are one of the most effective options for shed walls because they provide strong insulation while keeping the wall build-up relatively slim.
Step 6: Insulate the Shed Roof
Heat rises, so insulating the roof is very important. A poorly insulated roof can allow warmth to escape quickly in winter and can make the shed uncomfortably hot in summer.
How to insulate a shed roof:
- Check the roof is watertight before starting.
- Measure between the roof rafters.
- Cut insulation boards or rolls to fit.
- Leave a ventilation gap where required to reduce condensation risk.
- Secure insulation in place.
- Cover with plywood, OSB, or another internal finish.
If your shed has a felt roof, inspect the felt carefully. Replace damaged or worn felt before insulating inside.
Step 7: Insulate the Door
Shed doors are often thin and draughty. Even if the walls and roof are well insulated, heat can still escape through the door.
To insulate a shed door:
- Fit rigid insulation board to the inside of the door
- Cover it with plywood for protection
- Add weatherstripping around the frame
- Use a draught excluder at the bottom
- Seal gaps around hinges and edges
Make sure the door can still open and close properly after insulation is fitted.
Step 8: Improve Window Insulation
Windows can be another major source of heat loss. If your shed has single-glazed windows, you can improve insulation by sealing gaps and adding secondary glazing film.
Options include:
- Window insulation film
- Acrylic secondary glazing panels
- Draught-proofing tape
- Thermal blinds or curtains
- Replacing damaged panes
If you are turning your shed into a garden office or studio, upgrading the windows may be worth considering.
Step 9: Line the Interior
Once the insulation is fitted, add an internal lining to protect it and create a cleaner finish. Popular lining options include:
- Plywood
- OSB board
- MDF
- Tongue-and-groove cladding
- Plasterboard
Plywood and OSB are durable choices for workshops and storage sheds because they can handle knocks and allow you to fix shelves or hooks to the walls.
For a more polished garden office look, plasterboard or timber cladding may be preferred.
Step 10: Ventilate the Shed
While sealing gaps is important, your shed still needs controlled ventilation. Without airflow, condensation can build up inside, especially if you use heating or spend long periods in the shed.
Consider adding:
- Wall vents
- Roof vents
- Trickle vents
- Opening windows
- A small extractor fan for workshops or gyms
Good ventilation helps keep the shed dry and prevents musty smells.
How Much Does It Cost to Insulate a Shed?
The cost of insulating a shed depends on its size, the insulation material, and whether you do the work yourself or hire a professional.
A small DIY shed insulation project using basic foil or bubble insulation may be relatively affordable. A larger garden office-style insulation project using rigid boards, internal lining, flooring, electrics, and heating will cost more.
The main cost factors include:
- Shed size
- Type and thickness of insulation
- Floor, wall, and roof construction
- Interior lining material
- Damp-proofing requirements
- Whether windows and doors need upgrading
- Labour costs if using a tradesperson
Although insulating a shed requires upfront investment, it can make the space far more practical and comfortable throughout the year.
Common Mistakes to Avoid When Insulating a Shed
To get the best result, avoid these common mistakes:
Ignoring Damp Problems
Never insulate over damp, rot, or leaks. Fix the source of moisture first.
Blocking Ventilation Completely
A sealed shed with no ventilation can suffer from condensation and mould.
Using the Wrong Insulation
Choose insulation that suits the shed’s purpose. A basic storage shed may not need the same level of insulation as a garden office.
Leaving Gaps
Insulation should fit neatly. Gaps reduce performance and allow draughts.
Forgetting the Floor
Many people insulate the walls and roof but forget the floor. This can leave the shed feeling cold.
Not Protecting the Insulation
Most insulation should be covered with an internal lining to prevent damage and improve appearance.
Can You Insulate an Existing Shed?
Yes, you can insulate an existing shed, provided it is in good condition. In many cases, existing sheds can be upgraded with insulation, internal boarding, draught-proofing, and better ventilation.
However, if the shed is badly damaged, leaking, or rotting, it may be better to repair or replace it before investing in insulation.
Is It Worth Insulating a Shed?
Insulating a shed is worth it if you want to use the space regularly, store valuable items, or create a more comfortable environment. It is especially worthwhile for garden offices, workshops, studios, gyms, and hobby rooms.
For a simple tool shed, basic insulation and draught-proofing may be enough. For a shed used daily, higher-quality insulation will usually provide better long-term comfort and performance.
Conclusion
Insulating a shed is one of the best ways to turn a basic outdoor structure into a practical, comfortable, and usable space. By insulating the floor, walls, roof, door, and windows, you can reduce heat loss, control condensation, and make the shed suitable for year-round use.
The key is to start with a dry, weatherproof structure, choose the right insulation material, seal gaps carefully, and maintain proper ventilation. Whether you are creating a home office, workshop, gym, or storage space, proper shed insulation can make a noticeable difference.
Contact us today for all your insulation needs.
0203 929 3999
sales@wray-techsupplies.com
FAQs
What is the best way to insulate a shed?
The best way to insulate a shed is to insulate the floor, walls, roof, door, and windows while also sealing draughts and allowing controlled ventilation. Rigid foam boards are often a strong choice because they provide good thermal performance without taking up too much space.
What is the cheapest way to insulate a shed?
The cheapest way to insulate a shed is usually with bubble foil insulation, foil-backed insulation, or basic insulation rolls. These options can help reduce draughts and heat loss, although they may not perform as well as rigid insulation boards.
Do I need a damp-proof membrane when insulating a shed?
In many cases, yes. A damp-proof membrane helps protect the shed floor and insulation from moisture. This is especially important if the shed is built on a concrete base or if the floor is close to the ground.
Can I insulate a shed myself?
Yes, many shed insulation projects can be completed as a DIY job. However, if your shed needs electrical work, major structural repairs, or professional finishing, it may be best to hire a qualified tradesperson.
Should I insulate the floor of my shed?
Yes, insulating the floor can make a big difference, especially if you plan to use the shed in winter. Cold air can rise through the floor, making the space uncomfortable even if the walls and roof are insulated.
How do I stop condensation in an insulated shed?
To reduce condensation, make sure the shed is dry, sealed against leaks, fitted with a suitable vapour control or damp-proof layer, and properly ventilated. Avoid blocking all airflow, as this can trap moisture inside.
Can I use loft insulation in a shed?
Loft insulation can be used in some sheds, particularly between timber studs or rafters, but it must be kept dry and protected with an internal lining. Rigid insulation boards are often easier to fit neatly in sheds.
Is it worth insulating a shed for storage?
Yes, especially if you store tools, furniture, paint, sports equipment, or electrical items. Insulation can help reduce temperature changes and condensation, protecting your belongings from damp and damage.
Do I need ventilation in an insulated shed?
Yes. Ventilation is important because it helps moisture escape. Without ventilation, an insulated shed can become damp, musty, or prone to mould.
Can I turn an insulated shed into an office?
Yes, an insulated shed can be turned into a garden office if it is structurally sound, weatherproof, properly insulated, ventilated, and fitted with suitable electrics, lighting, heating, and security.